For our lab this week, my group was tasked with creating clay pots with 500 grams of commercial clay and varying amounts of three types of tempers: Sand, gravel, and chaff (sawdust or hay). We began by gathering together our 500 grams of clay with 80 grams of sand, 17 grams or gravel, and 3 grams of chaff. Emmett and I used sawdust for our chaff, while Glen used the hay. We then had to fully incorporate the tempers with the clay and knead the mixture until fully combined, which took a fair amount of work. All three of us used the total amount of each temper, so when we had finished mixing everything together, our clay + temper was ~600 grams (some of the temper may have been lost in the kneading process). Our final clay mixtures were ~83.3% clay, ~13.3% sand, ~2.83% gravel, and ~0.5% chaff. Creating and combining our clay mixtures took almost an hour, with some variation depending on how we each chose to mix in the tempers–I chose to mix them all in separately, which took longer. The final clay was coarse with pieces of temper visible, and it required consistent hydrating.
| Clay | Sand | Gravel | Chaff | |
| weight | 500 grams | 80 grams | 17 grams | 3 grams |
| percent | 83.3% | 13.3% | 2.83% | 0.5% |
*It is important to note that one of the scales we used was giving inconsistent results, so that may impact our results–particularly my initial weight for my pot.
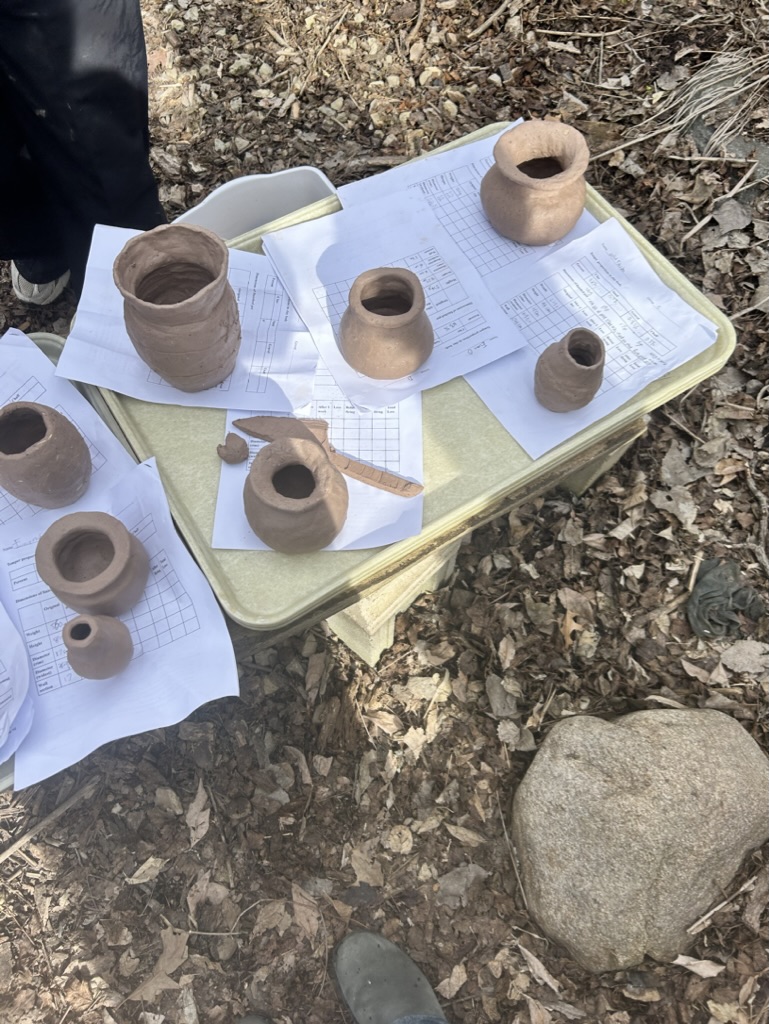
Once we had added our tempers, we moved onto creating our pinch pots out of about a third of our clay mixture–around 200 grams, with the walls and rim coming out to be about a quarter of an inch. This was a relatively quick process, and we soon moved onto rolling out coils to stack and blend on top of the original pinch pot to create a final product that resembled the carinated or sub-biconical forms. This required consistent hydration and careful blending, as the clay dried out quickly while we were working with it. Once we had all completed our pots, we took our initial measurements–height, weight, diameter of the rim, diameter of the widest part of the pot, and the wall section.
The next day in class, after letting the pots dry overnight, we took measurements again–which we will do again after a week has passed, before firing, and after firing–and burnished and decorated our pots. We also rehydrated our pots in certain areas to smooth out uneven areas or repair cracks to ensure the pot had a better chance at surviving firing. Overall, all three of us in group 3 had successfully constructed pots of varying size. Since we used the commercial clay, our pots all dried to a light brown/gray color. My pot was thin and oval with a small opening and rim. Emmett’s was much larger with a significant everted rim. One of Glen’s was a small bowl shaped structure without coils added, and this made it smoother and easier to burnish. As we burnished our pots the next day, bits of temper came to the surface, adding a silver appearance to the dried clay.
Data:
Note: Within our data, there are several instances where the pots gained rather than lost weight or where the width of the wall section increased after drying. The former was likely due to inaccurate measurements with the scale we used in lab rather than the pots actually gaining weight, and the width increase in the wall sections between the measurements in lab and the measurements the next day was probably due to us measuring different spots in the wall section, because width was not uniform throughout the pot. These inconsistencies are denoted with asterisks in the data tables.
| Original measurements | After 1 day | Loss | Before firing | Loss | After firing | Loss | |
| weight (grams) | 560 g | 520 g | -40 grams | no data | no data | 460 g | 60 g |
| height (centimeters) | 80 cm | 70 cm | -10 cm | 70 cm | 0 | 70 cm | 0 |
| diameter–rim (centimeters) | 17 cm | 13 cm | -4 cm | 13 cm | 0 | 12 cm | 1 cm |
| diameter–widest part of pot(centimeters) | 85 cm | 85 cm | 0 | 85 cm | 0 | 85 cm | 0 |
| wall section (centimeters) | 17 cm | 19 cm | +2* cm | 17 cm | 2 cm | 16 cm | 1 cm |
| Original measurements | After 1 day | Loss | Before firing | Loss | After firing | Total Loss | |
| weight (grams) | 152 g | 140 g | -8 g | 132 g | 8 g | 124 g | 8 g |
| height (centimeters) | 4.5 cm | 4.5 cm | 0 | 4.3 cm | 2 cm | 4.2 cm | 1 cm |
| diameter–rim (centimeters) | 5.8 cm | 6.1 cm | +0.3 cm* | 2.3 cm | 3.8 cm | 7 cm | +4.7* |
| diameter–widest part of pot (centimeters) | 5.8 cm | 6.1 cm | + 0.3 cm* | 7.3 cm* | +1.2 cm* | 7 cm | 0.3 cm |
| wall section (centimeters) | 0.69 cm | 0.718 | +0.028* | 0.6 cm | 0.118 cm | 0.6 mm | 0 |
| Original measurements | After 1 day | Loss | |
| weight (grams) | 340 g | 359 g | +19 g* |
| height (centimeters) | 6 cm | 5.7 cm | -0.3 cm |
| diameter–rim (centimeters) | 7.5 cm | 7 cm | -0.5 cm |
| diameter–widest part of pot (centimeters) | 11.7 cm | 10.5 cm | -1.2 cm |
| wall section (centimeters) | 0.745 cm | 0.95 cm | +0.205 cm* |
| Original measurements | After 1 day | Loss | Before firing | Loss | After firing | Total loss | |
| weight (grams) | 228 g | 340 g | +112 g* | 315 g | 25 g | 271 g | 44 g |
| height (centimeters) | 9.5 cm | 9.4 cm | -0.1 cm | 9.4 cm | 0 | 8.75 cm | 0.65 cm |
| diameter–rim (centimeters) | 4 cm | 3.8 cm | -0.2 cm | 3.5 cm | 0.3 cm | 3.5 cm | 0 |
| diameter–widest part of pot (centimeters) | 6.9 cm | 6.4 cm | -0.5 cm | 5.5 cm | 0.9 cm | 4 cm | 1.5 cm |
| wall section (centimeters) | 0.4 cm | 0.39 cm | -0.1 cm | 0.32 cm | 0.07 cm | 0.29 cm | 0.03 cm |
Pre and post-firing, we took new measurements to see how our methods of firing affected our pots. The large amounts of temper (vegetable material) seemed to help our pots not shatter, which we thought might happen. Although we did have some minimal breakage, our pots overall held up better than we expected, which I think can be attributed to the temper.
0 thoughts on “Week 3 Lab Data, Group C: Pottery”