
Introduction:
In this lab we were tasked with creating two different types of metal brooches using two methods: casting and fabrication. We were separated into three groups; each group would make one casting in historical form using a 3D printed resin model. Each individual made one fabricated brooch from copper sheet metal. This lab was completed in the metalworking studio in Boliou. Danny Saathoff served as our metalworking expert and instructor. Certain steps in the processes were completed by Danny prior to the lab to ensure that we would have a certain number of finished products at the end.

Research Questions:
- To gain an experiential understanding of the steps in the chaine operatoire of non-ferrous metal working
- To compare the two main methods of producing an annular (circular) brooch: casting and sheet metal working
- What are the affordances and limitations of the two different processes?
- How does the order of operations compare?
- What constraints do the production processes impose on the desired finished product?
- Which steps in either process required specialist training and expertise and which can be accomplished by less experienced “apprentices” or novices?
- What implications do these considerations have on who would have been responsible for this work in an early medieval village setting?

Equipment:
- Bronze and brass sheets
- Assorted Hammers
- Scale
- Laser thermometer
- Rulers
- Lab manual with historic forms
- Scoring tools
- Punches
- Centrifugal casting machine
- Crucibles
- Kiln
- 3D printed resin template
- Bronze and brass wire
- Belt sander
- Polishing wheel
- Files
- Saws

Procedure:

Brooch Casting
1. At the beginning of the casting process the wax model, held by sprues, is placed in a metal flask and covered with investment (plaster). The flask is then fired as follows: heat up the kiln to 300 F, let it sit at that temperature for two hours, increase to 1350 F for a few more hours, then decrease to 1150 F and remove when ready (this step was completed prior to the lab).
2. Weigh out 30 pennyweights of brass pellets and add it to the crucible
3. Rotate the centrifugal casting machine 2 ½ times and engage the pin before beginning.
4. Heat the metal with a combined acetylene/oxygen torch until it is completely melted.
5. Once the metal is fully melted, take the flask out of the kiln and place it behind the crucible.
6. Pull back on the weight to release the pin and allow the machine to spin and the metal to fill the form.
7. When the machine stops spinning, use the metal tongs to remove the flask and quench it in a bucket of water. Once the water stops boiling, reach in and remove the flask and the brooch. The investment will have dissolved away.
8. Using a wire cutter, cut off the sprues, then use a file and the belt sander to grind down the stumps. Clean off investment throughout the process.
9. On the polishing wheel, use the scotch brite wheel to clean the metal and, if desired, use a polishing wheel to give the metal a higher shine.
10. Cut a piece of 12ga brass wire to measure slightly more than the diameter of the brooch, and file down the tip until sharp to make the pin.
11. File down a spot in the brooch to create a trough for the pin to lie in.
12. Use the pliers to bend the non-sharpened end of the wire pin around the brooch and adjust as needed.

Fabricated Brooch
1. Using a center punch and construction hammer, punch an indentation into the center of the sheet. Using a compass, trace a large circle to the edges of the square, and a smaller circle within the larger circle.
2. Use a jewelers saw to cut around the outside of the large circle.
3. Thread the saw blade through the drilled hold to saw the center circle, forming a ring
3. File down the circle until smooth.
4. Stamp a pattern into it using metal stamps and a hammer. If the brooch warps hammer it flat with a nylon or hide mallet.
5. Drill two small holes in close proximity into the ring and use the jewelers saw to cut between them to create a hole for the pin.
8. Cut a wire down to a little over the diameter of the brooch and file down the tip until sharp to make the pin.
9. Use pliers to bend the non-sharpened end of the wire pin through the hole in the brooch
Data:


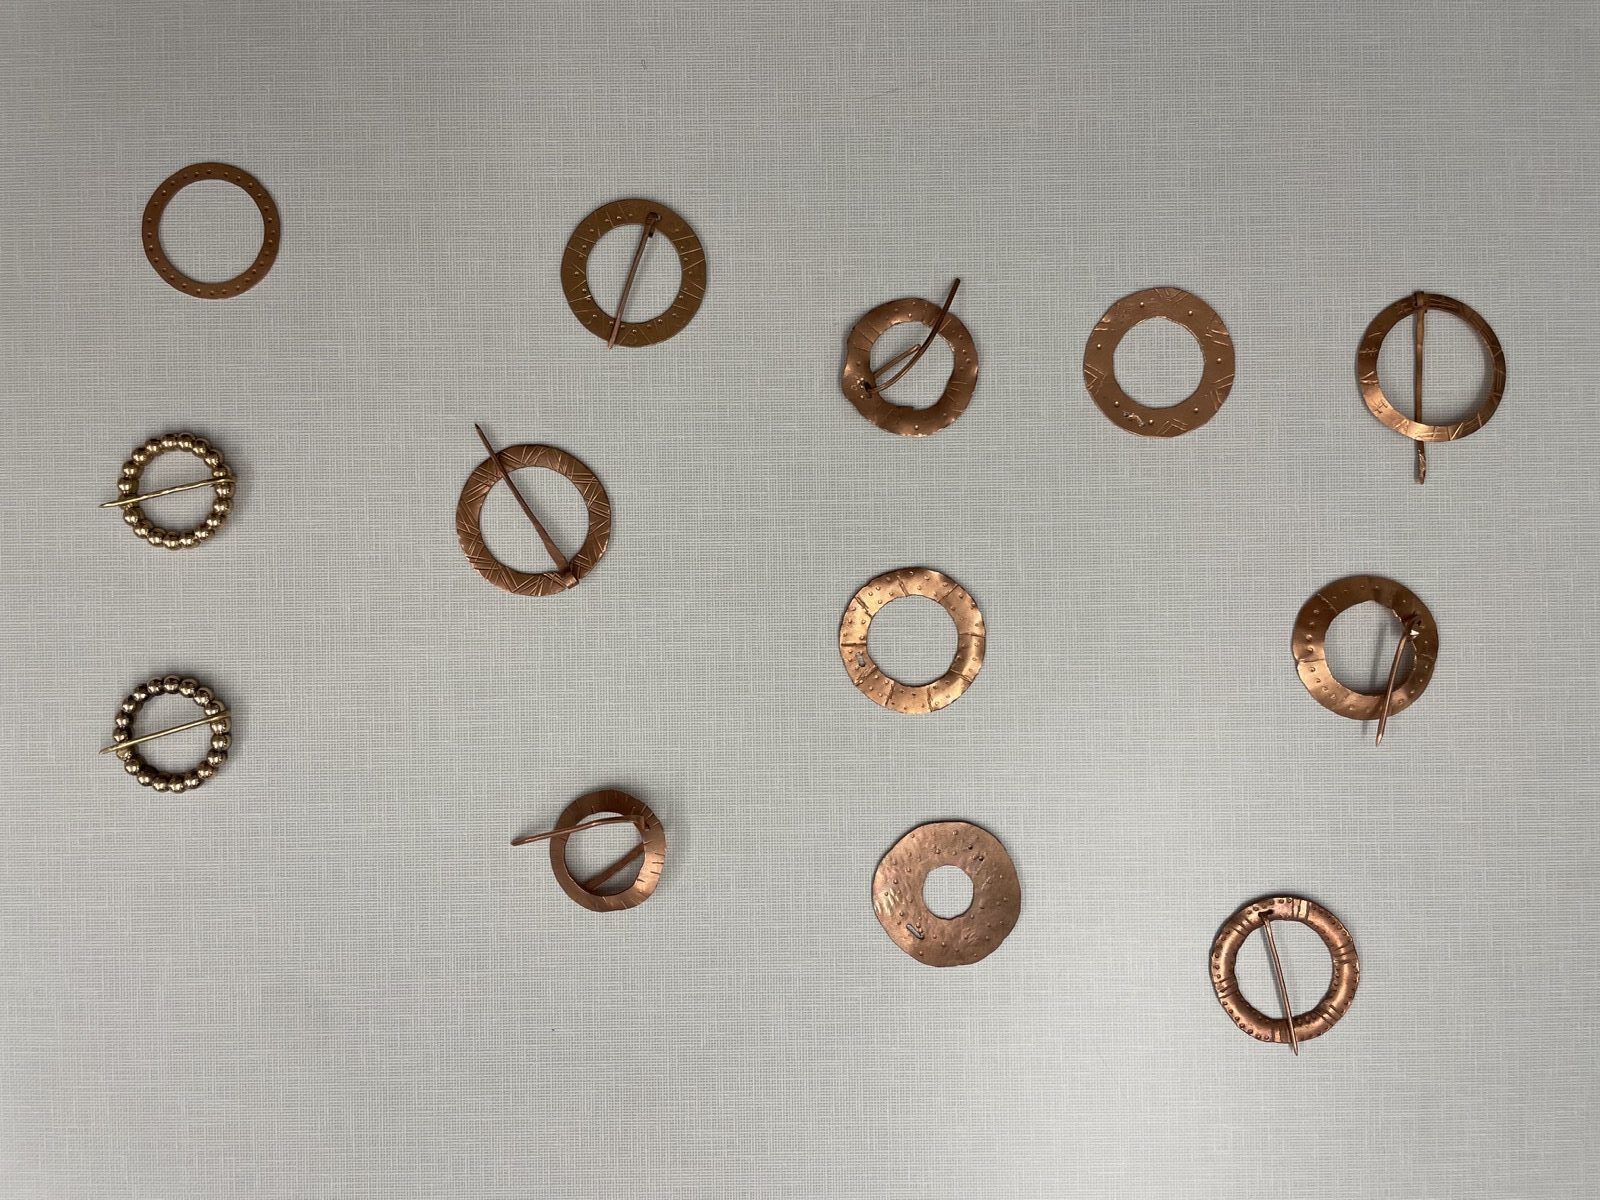
Each person created an individual broach from sheet metal, although a number of those brooches were incomplete. We also had a total of four successful cast brooches.
Conclusion:
Creating brooches in the metalworking studio and with Danny’s help and supervision gave the class an inside look into some of the processes that were part of replicating these historic objects. For many in the class, making fabricated brooches was more difficult than anticipated, however the end results of the lab were generally successful. Many students struggled to use the jeweler’s saw, and found the task time consuming and challenging. There are many factors that come into play when sawing sheet metal: the angle of the saw blade, the weight one moves the saw, the nature of the metal itself, and so on. However, in experiencing how one might have fabricated a metal brooch, we could see the various ways we can recreate pieces similar to excavated brooches. In recreating the brooches we were not privy to all the processes, so certain aspects of the lab included trial and error to get the desired results. For example, we cannot tell exactly how people in the past made holes in the middle of their brooches or how they made the brooches bend. However, we were able to create pins that successfully held up fabric and seemed similar to the mechanisms of excavated brooches.


In class, post lab, we discussed the viability of beginning with sheet metal vs. casting and could not come to the conclusion of which would be easier to do at the time. We missed — or perhaps replaced — many steps in the Chaîne Opératiore of this process, which affected our perception of both processes. Another question that we did not explore in this lab was the process of creating a fire that would be hot enough and stable enough to melt metal.

Group Data Reports
-
Brooch Making Group C Data

Metal Casting We started with 30 pennyweights of bronze casting grain poured into the crucible. The start time was 2:12 and the finish time was 2:20. Temperature (F) Steps 878.7 Initial heat of flame 1217 First metal temp 1276 Second metal temp 1624 Third metal temp (flask goes in) 1700 Pin dropped, spinning 998 Flask……
-
Metalworking Lab: Group B Data

The following piece is a play-by-play breakdown of Group B’s activities during the Metalworking lab, including quantitative data of metal weights and temperatures, and qualitative experiences. Danny introduces casting. Showing us what steps were done to prepare for our lab, specifically the creation of the mold. The steps for creating the mold were as follows……
-
Metalworking Lab Data Recording
Brooch casting 1. At the beginning of the casting process, the wax model and the wax wire supports are placed in a metal form with plaster. The form is then fired as follows: heat up the kiln to 300 F (all temperatures are taken in Fahrenheit), let it sit at that temperature for two hours,……
0 thoughts on “Week 4 Lab Summary: Metal Casting for Brooches”