Ruby Becker, Kenton Nagle, Maya Gabor
Introduction:
This lab took place at A Woolen Forest Farm & Studio, located on 15 acres in Lonsdale, Minnesota and owned by shepherdess and wool worker Alejandra Sanchez. In the week leading up to this lab, our experimental archeology class focused our learning towards ancient dyeing practices both in Europe and South America. Alejandra originally hails from Mexico and focuses predominantly on traditional Central/South American dyes and dyeing practices.
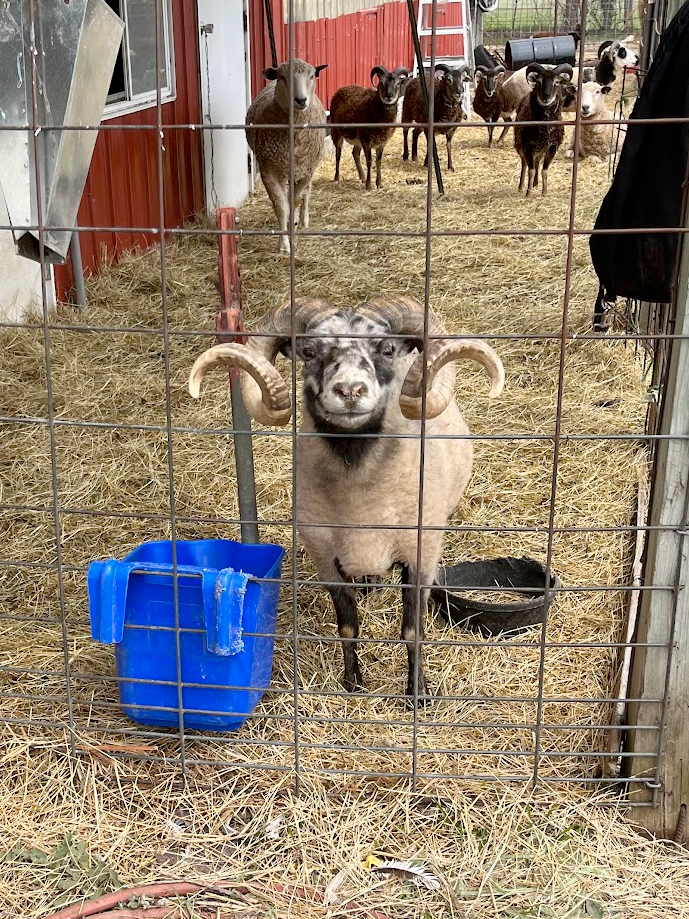
There is an eclectic collection of birds, cows, sheep and other domesticated animals living on Alejandra’s farm. Within her sheep herd, where she gets her wool for spinning and dyeing, there are about 5 different breeds with different coats and sizes, creating an varied flock. For the first half of our visit, Alejandra introduced us to the different members of the farm. Within her flock of sheep, she was very in tune with the personalities of individual members. They all had names and she knew their familial history.
The second half of the lab was spent dyeing wool naturally using marigold flowers, logwood bark and indigo. Dyeing was loads of fun! As a class we particularly enjoyed watching the indigo oxidize, turning from green to blue. Beyond the experiential element dyeing wool naturally over an open fire, we aimed to answer questions regarding the difference in wools used and the mixing of various dyes. Our detailed procedure for this process follows.
Process:
Dye Materials:
We used three main types of dyes: Marigold, Logwood, and Indigo.
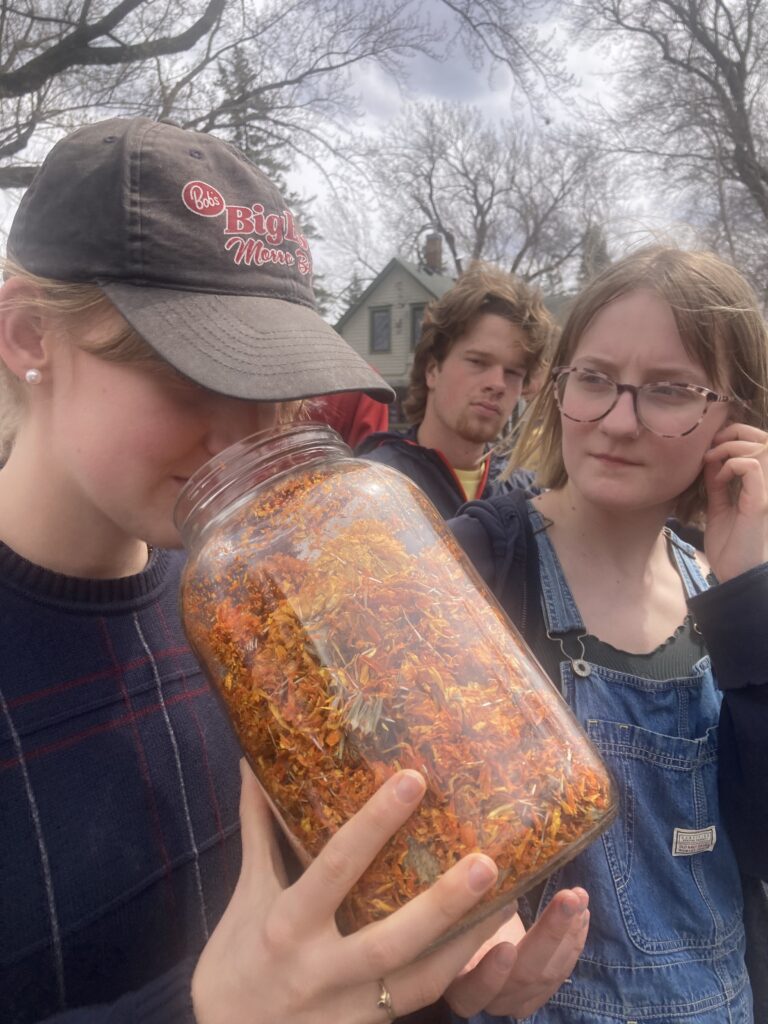
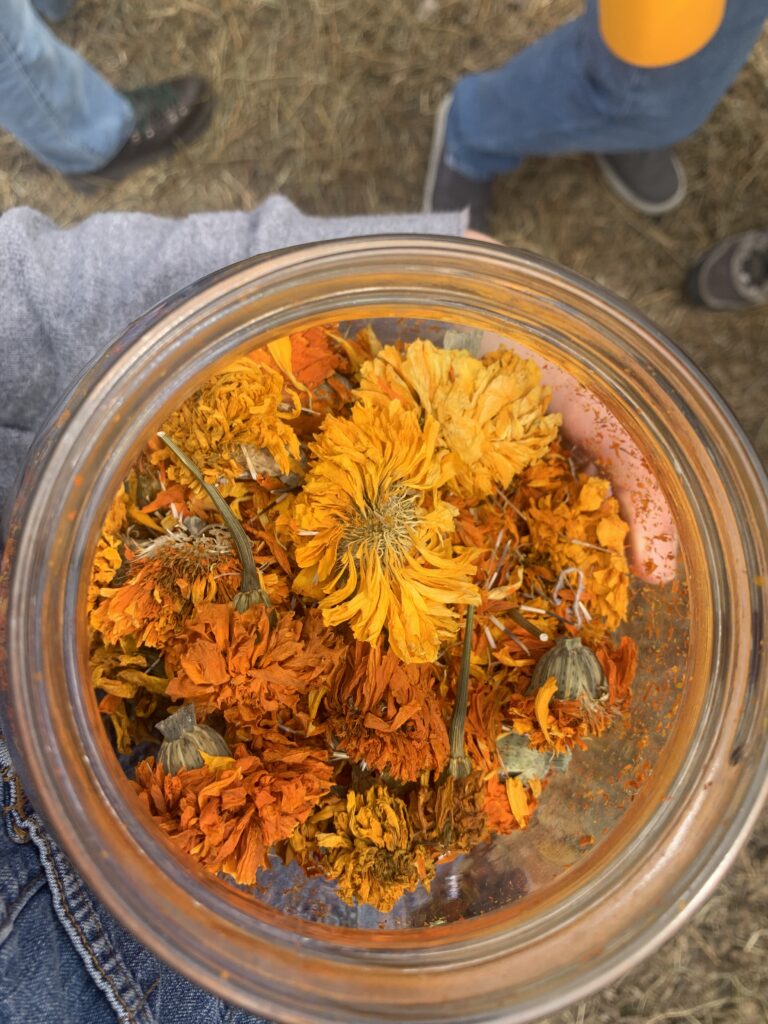
We used marigold grown by Alejandra, to create a deep yellow-gold color. In this case we used the full marigold flowers, including parts of the stem still connected to the flower. The flowers that we used were dried, and had a crisp, almost papery texture. Alejandra explained about the cultural significance of marigold, especially in Indigenous culture in Mexico where it is important to the Day of the Dead celebration, as well as has medicinal qualities. The Marigolds are known for their strong smell, which is key to their role in the Day of the Dead celebrations. There was disagreement among students about whether or not the smell was pleasant.
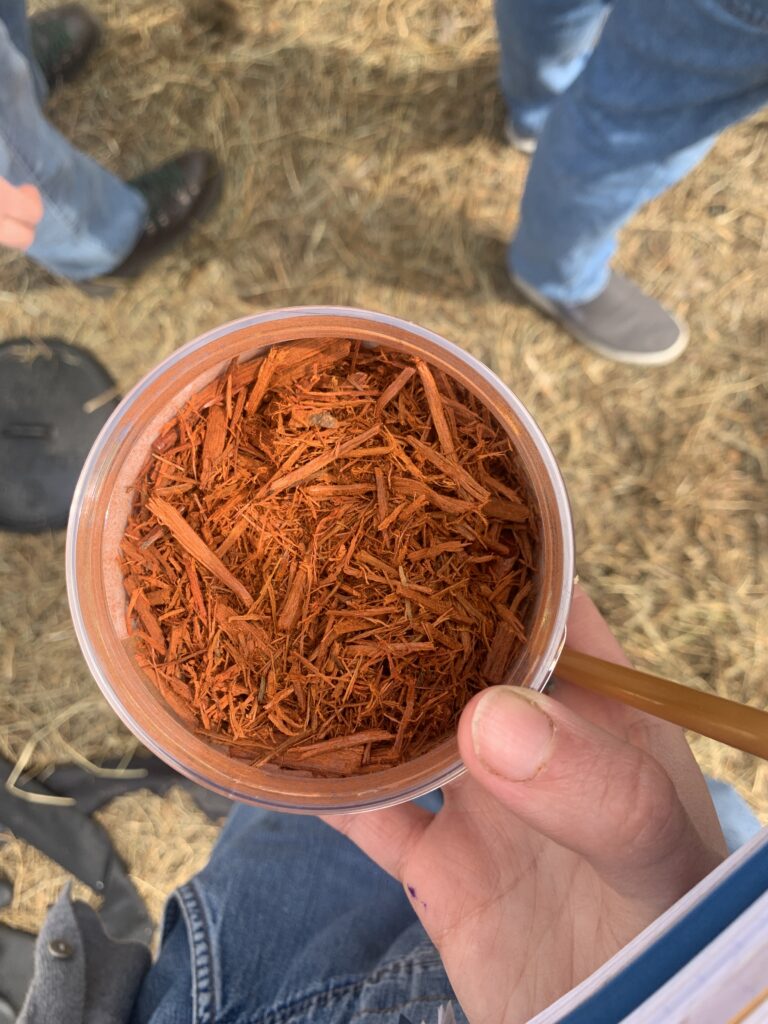
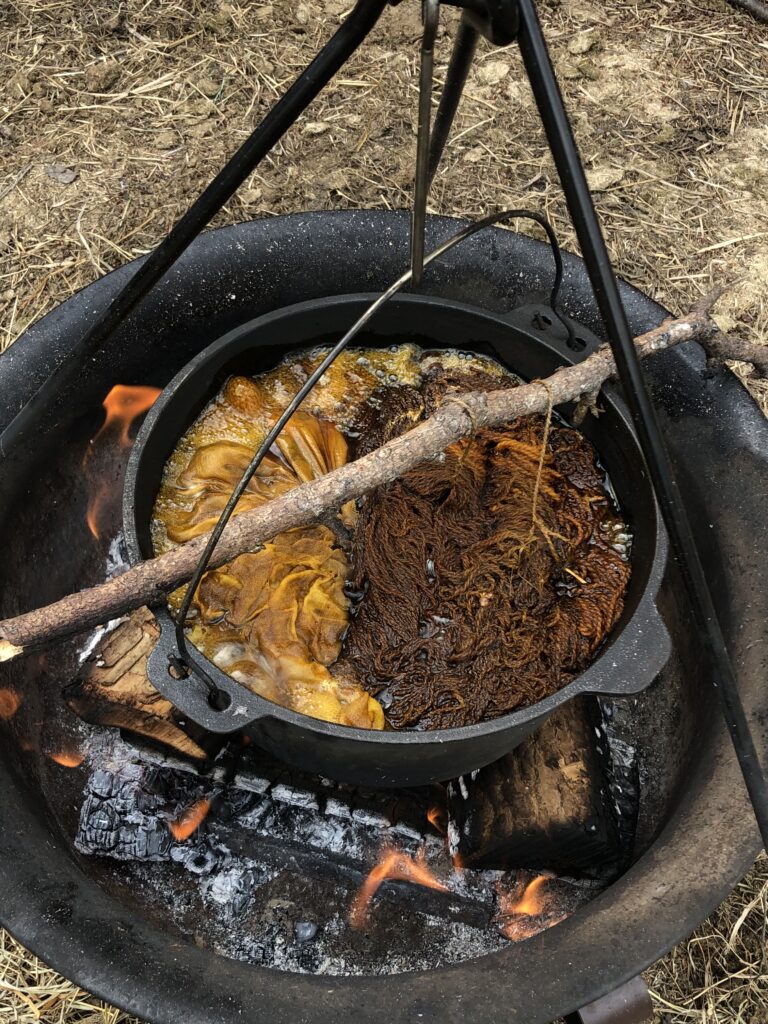
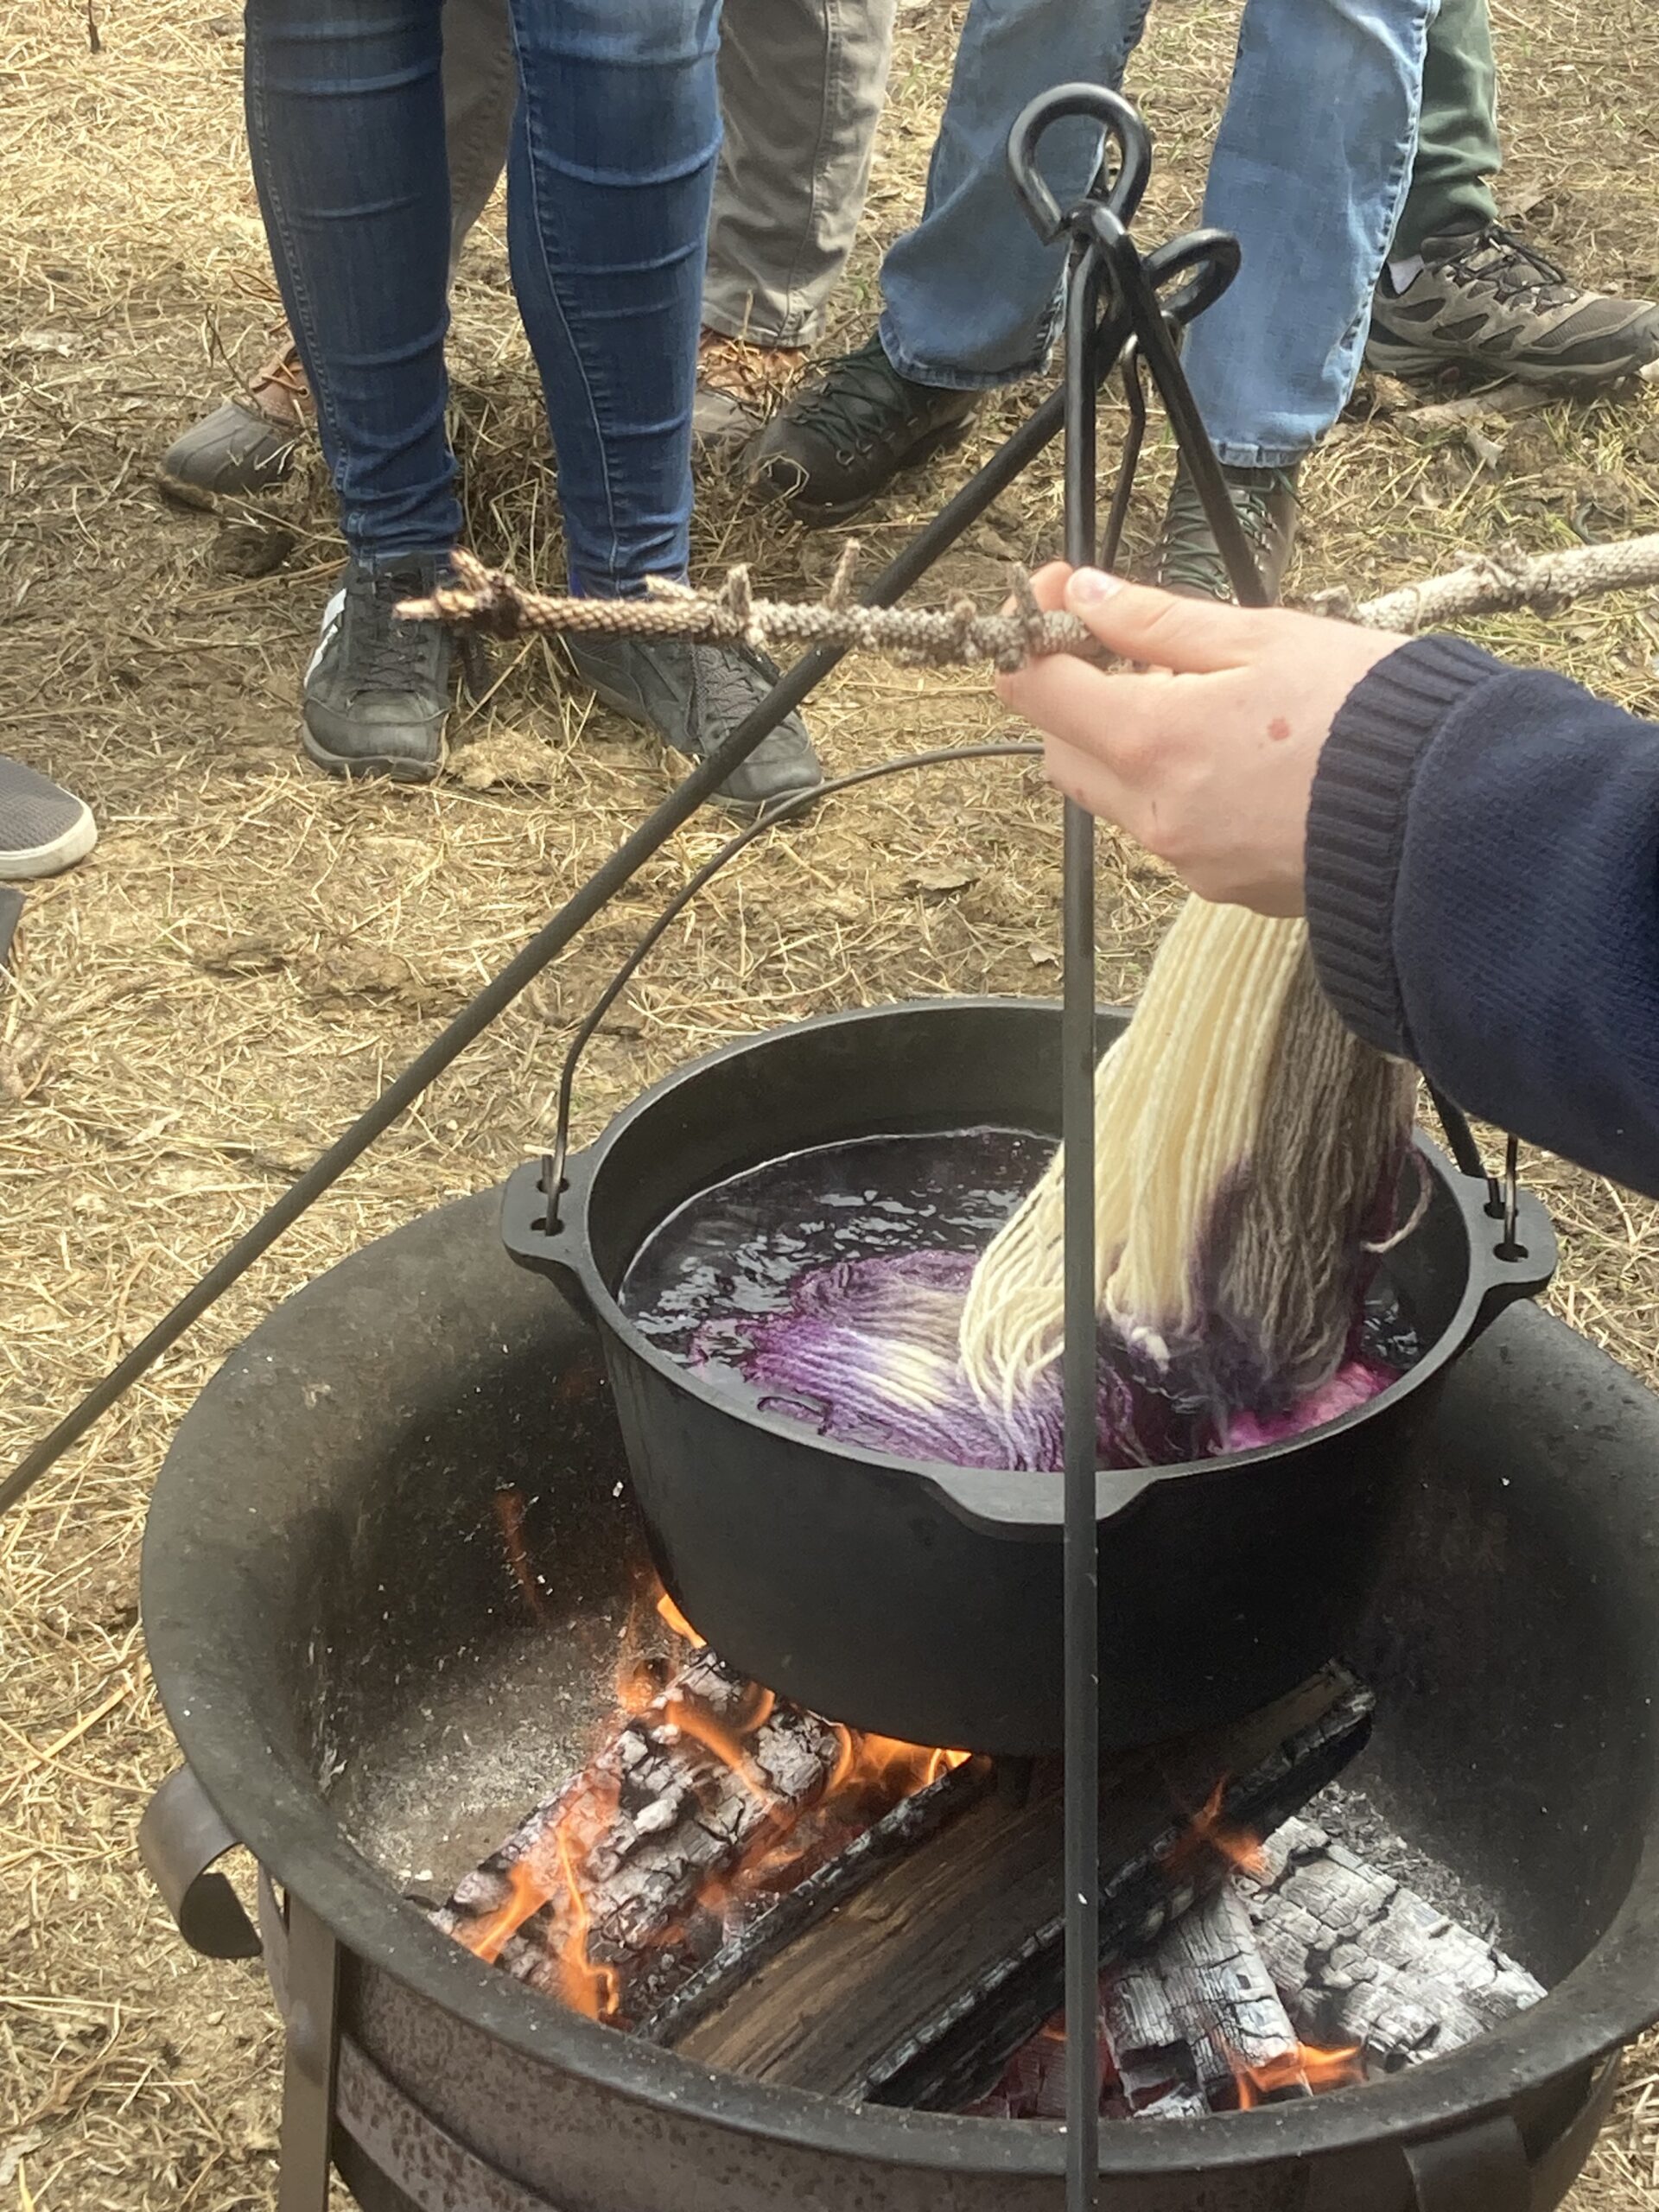
For a purple color, we used logwood, which Alejandra purchased. The logwood consists of fragments of wood, which are red-ish in color and have an powdery quality.
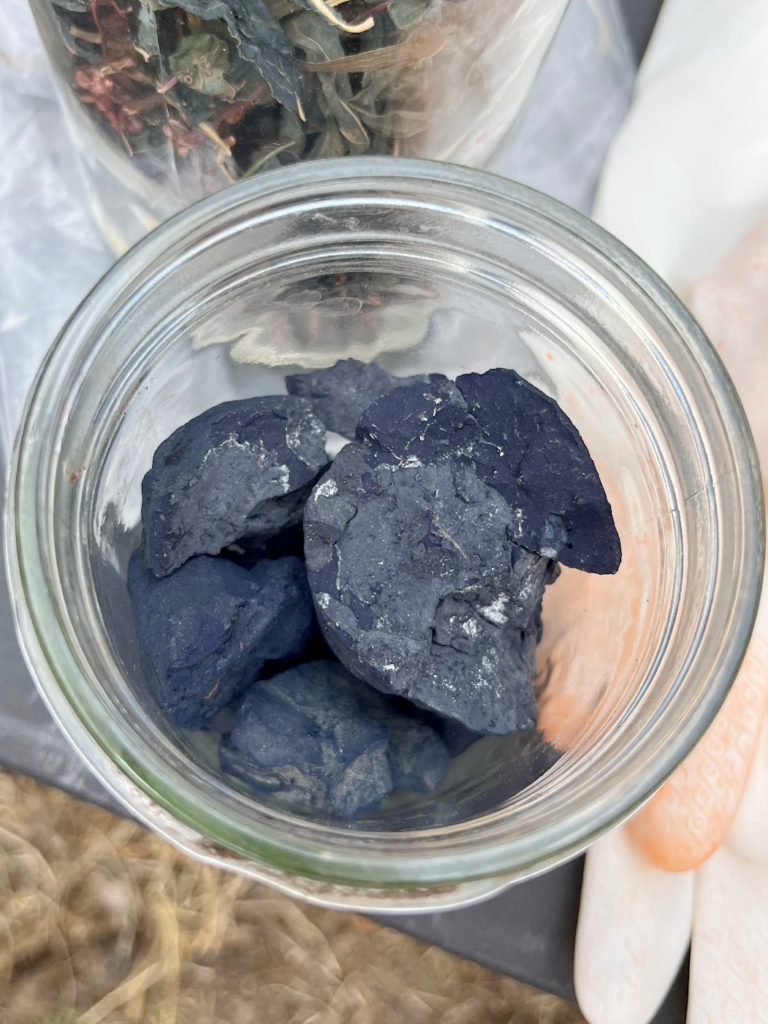
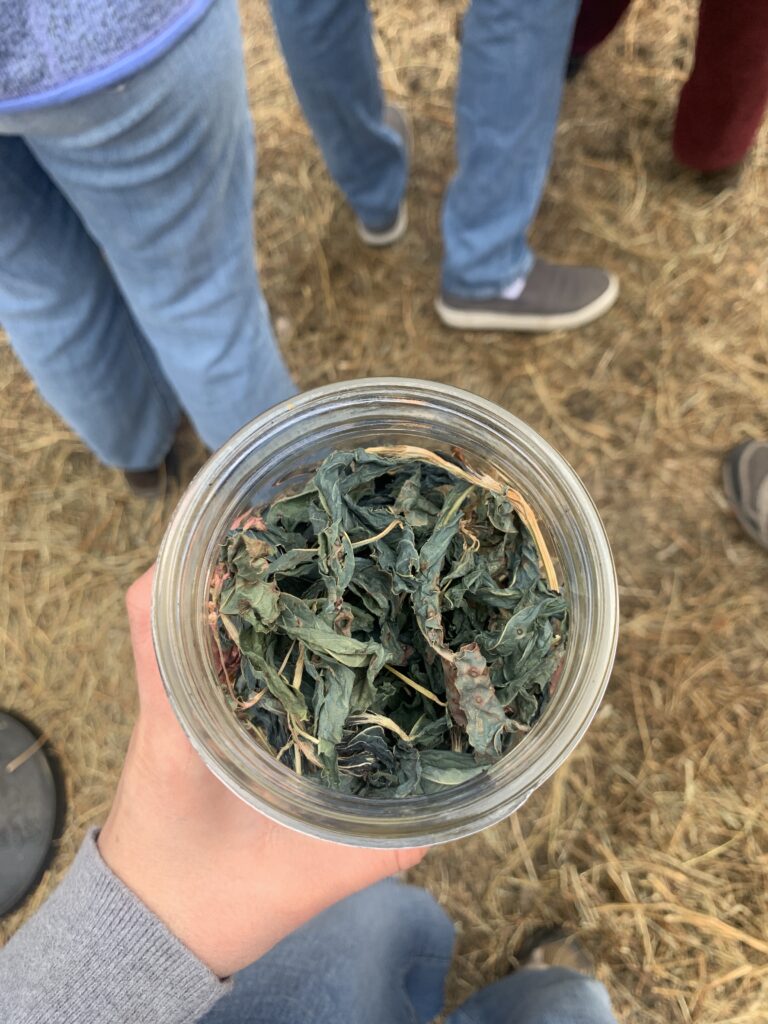
For blue, we used Indigo, also grown by Alejandra. She specifically grows Japanese indigo because it grows the best in the Minnesota climate. Alejandra showed us both the dried indigo plant, which included the leaves and parts of the stems of the indigo plant, and a powdered and fermented indigo product. In the case of the dried plant, the leaves were a greenish-blue color and the stems were brown to tan in color. The powdered and fermented product consisted of dark blue clumps.
Mordants:
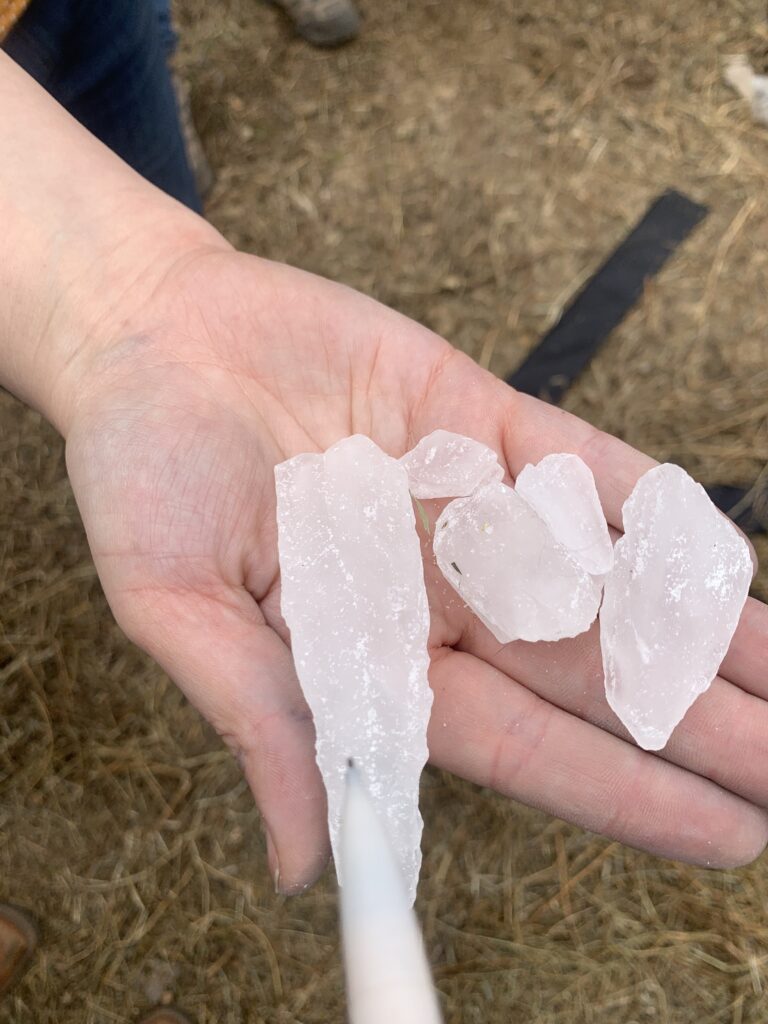
Alejandra soaked the yarn in an alum mordant before we used it for dying in the marigold and logwood dyes. Each skein of yarn was soaked in an alum solution for an hour. Alum is a mineral that can be used in water to make the dye adhere to the yarn more effectively. The alum shown to is the un-dissolved mineral.
Alejandra used 1 tablespoon of alum per 100 grams of wool in her mordant solution.
Iron can also be used as a mordant. Boiling our dyes in cast iron pots meant that iron introduced into the water during the dying process. Iron is considered to have a dulling effect on dyes.
The indigo dye did not require a mordant, and the wool and yarn was instead rinsed out in water before being dipped in the indigo vat.
Preparing the Dye:
Method 1:
For the marigold and logwood dyes, Meredith weighed the dying material and placed it in a cheesecloth to create a kind of dye “tea-bag.” Each dye had a different ratio of dying material to wool dyed.
We used:
- 100 grams of marigold
- 50 grams of logwood
Method 2:
Alejandra prepared the indigo vat before we arrived. She mixed lime, crushed and fermented indigo plant, and fructose to create an active indigo dye. The indigo must be kept at room temperature, or just above, and should also be kept from being oxidized. Alejandra explained that in moving the vat she allowed too much oxygen in and had to “revive” the dye so that it could be used. Additionally, indigo is very basic, and acid, such as lime, must be added to bring it down to around a pH of 10 for the best dying results. Again, this is something that Alejandra balanced before we arrived. She used pH strips to make sure that it is was at the correct level.
Preparing the Wool:
Method 1:
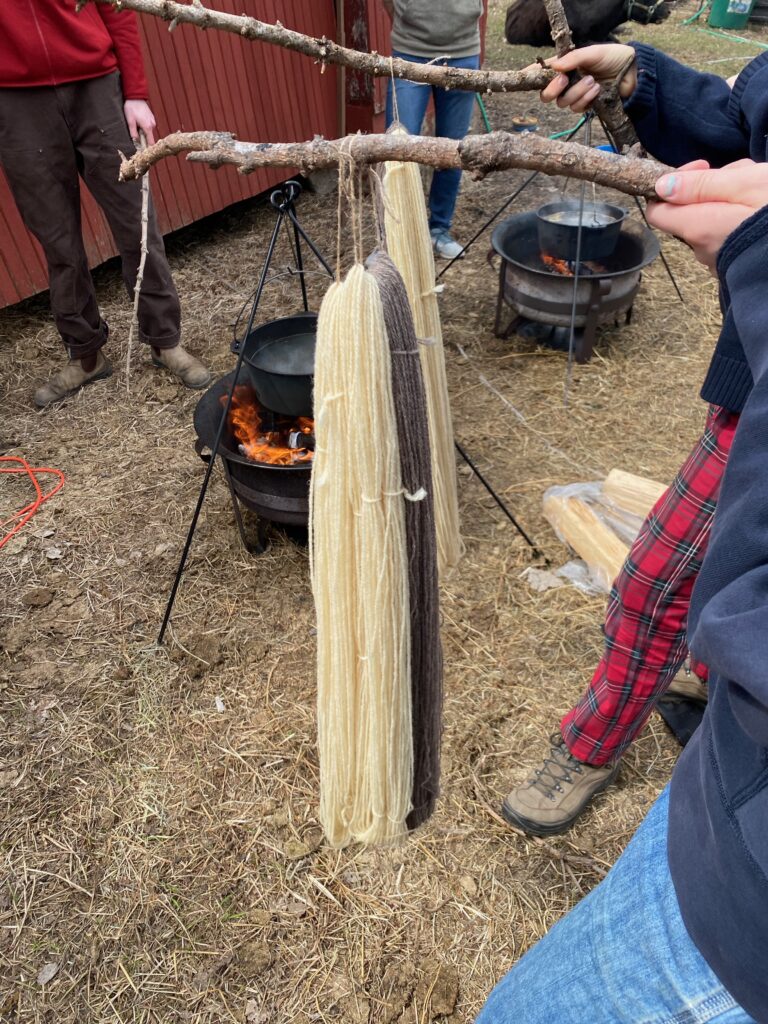
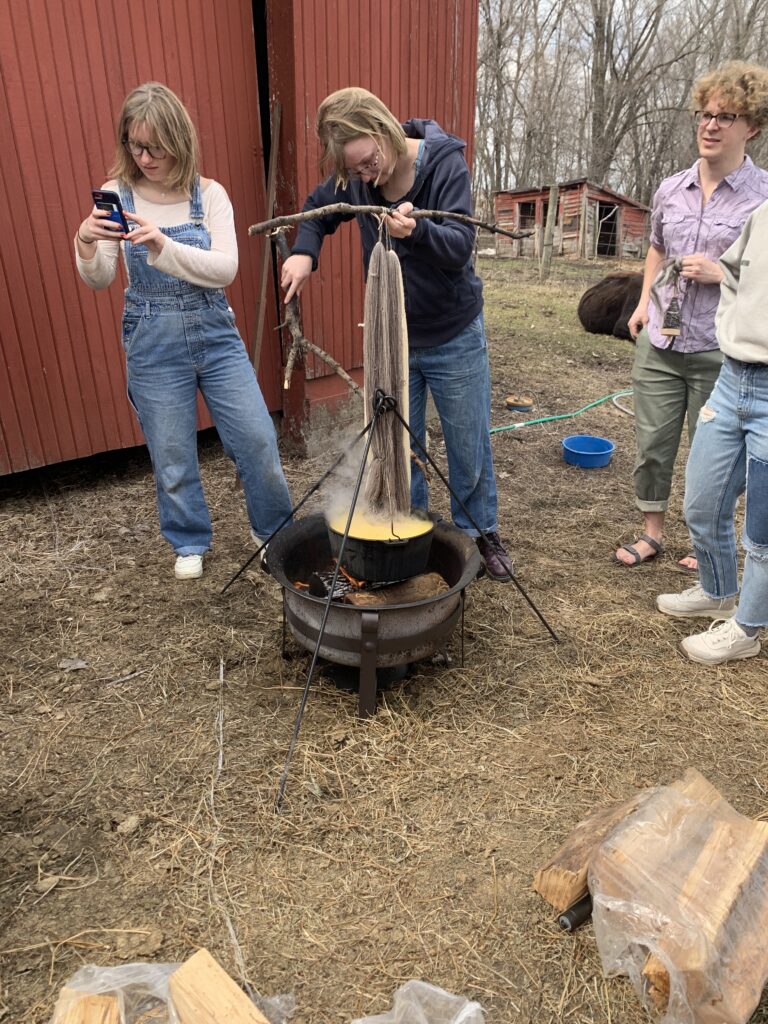
For the marigold and logwood dyes, we used wool that had been washed, carded, and then spun into yarn. The yarn was wrapped into 50 gram “hanks” which were then secured in two to three places to avoid tangling and then placed on a stick for easy dipping. For the logwood dye we used two 50 gram hanks, one white and the other gray. For the marigold we used four hanks, two white and two gray. Before placing them on the stick, each hank was soaked in alum mordant for one hour.
Method 2:
We ended up dying a variety of items in the indigo dye. Alejandra prepared two hanks of plain wool yarn, one white and the other gray. Before being dyed, each hank was rinsed out in water and squeezed as dry as possible. We also dyed two hanks that had been dyed in the marigold dye, one originally white and the other originally gray. After being removed from the marigold dye it was also rung out to remove the excess liquid. Additionally, we dyed both raw and carded wool, which was rinsed, wrung out, and then dyed. We were interested in seeing the effect that dye had on wool at different stages of processing.
Dyeing Process:
Dye Timeline (from Ellie, Lab Group D)
- 2:44pm – Started to soak yarn in marigold and logwood dye
- 3:10pm– Dipped pre-wetted yarn in indigo vat. This was only the first of our indigo dyeings of the afternoon.
- 3:40pm – Removed yarn from marigold dye
- 3:45pm – Immersed marigold-dyed yarn in indigo vat
- 3:49pm– Removed yarn from logwood dye
Method 1:
For the marigold and logwood dyes, Noah started a fire and placed pots of water on tripod-holders suspended above the fire. Once the water boiled, the dye bags were placed in the pot and the change in color was almost immediate. Once the dye was added, we placed the wool in the dye, putting the stick on the lip of the pot so as to suspend the yarn in the liquid. We boiled each dye for one hour.
Method 2:
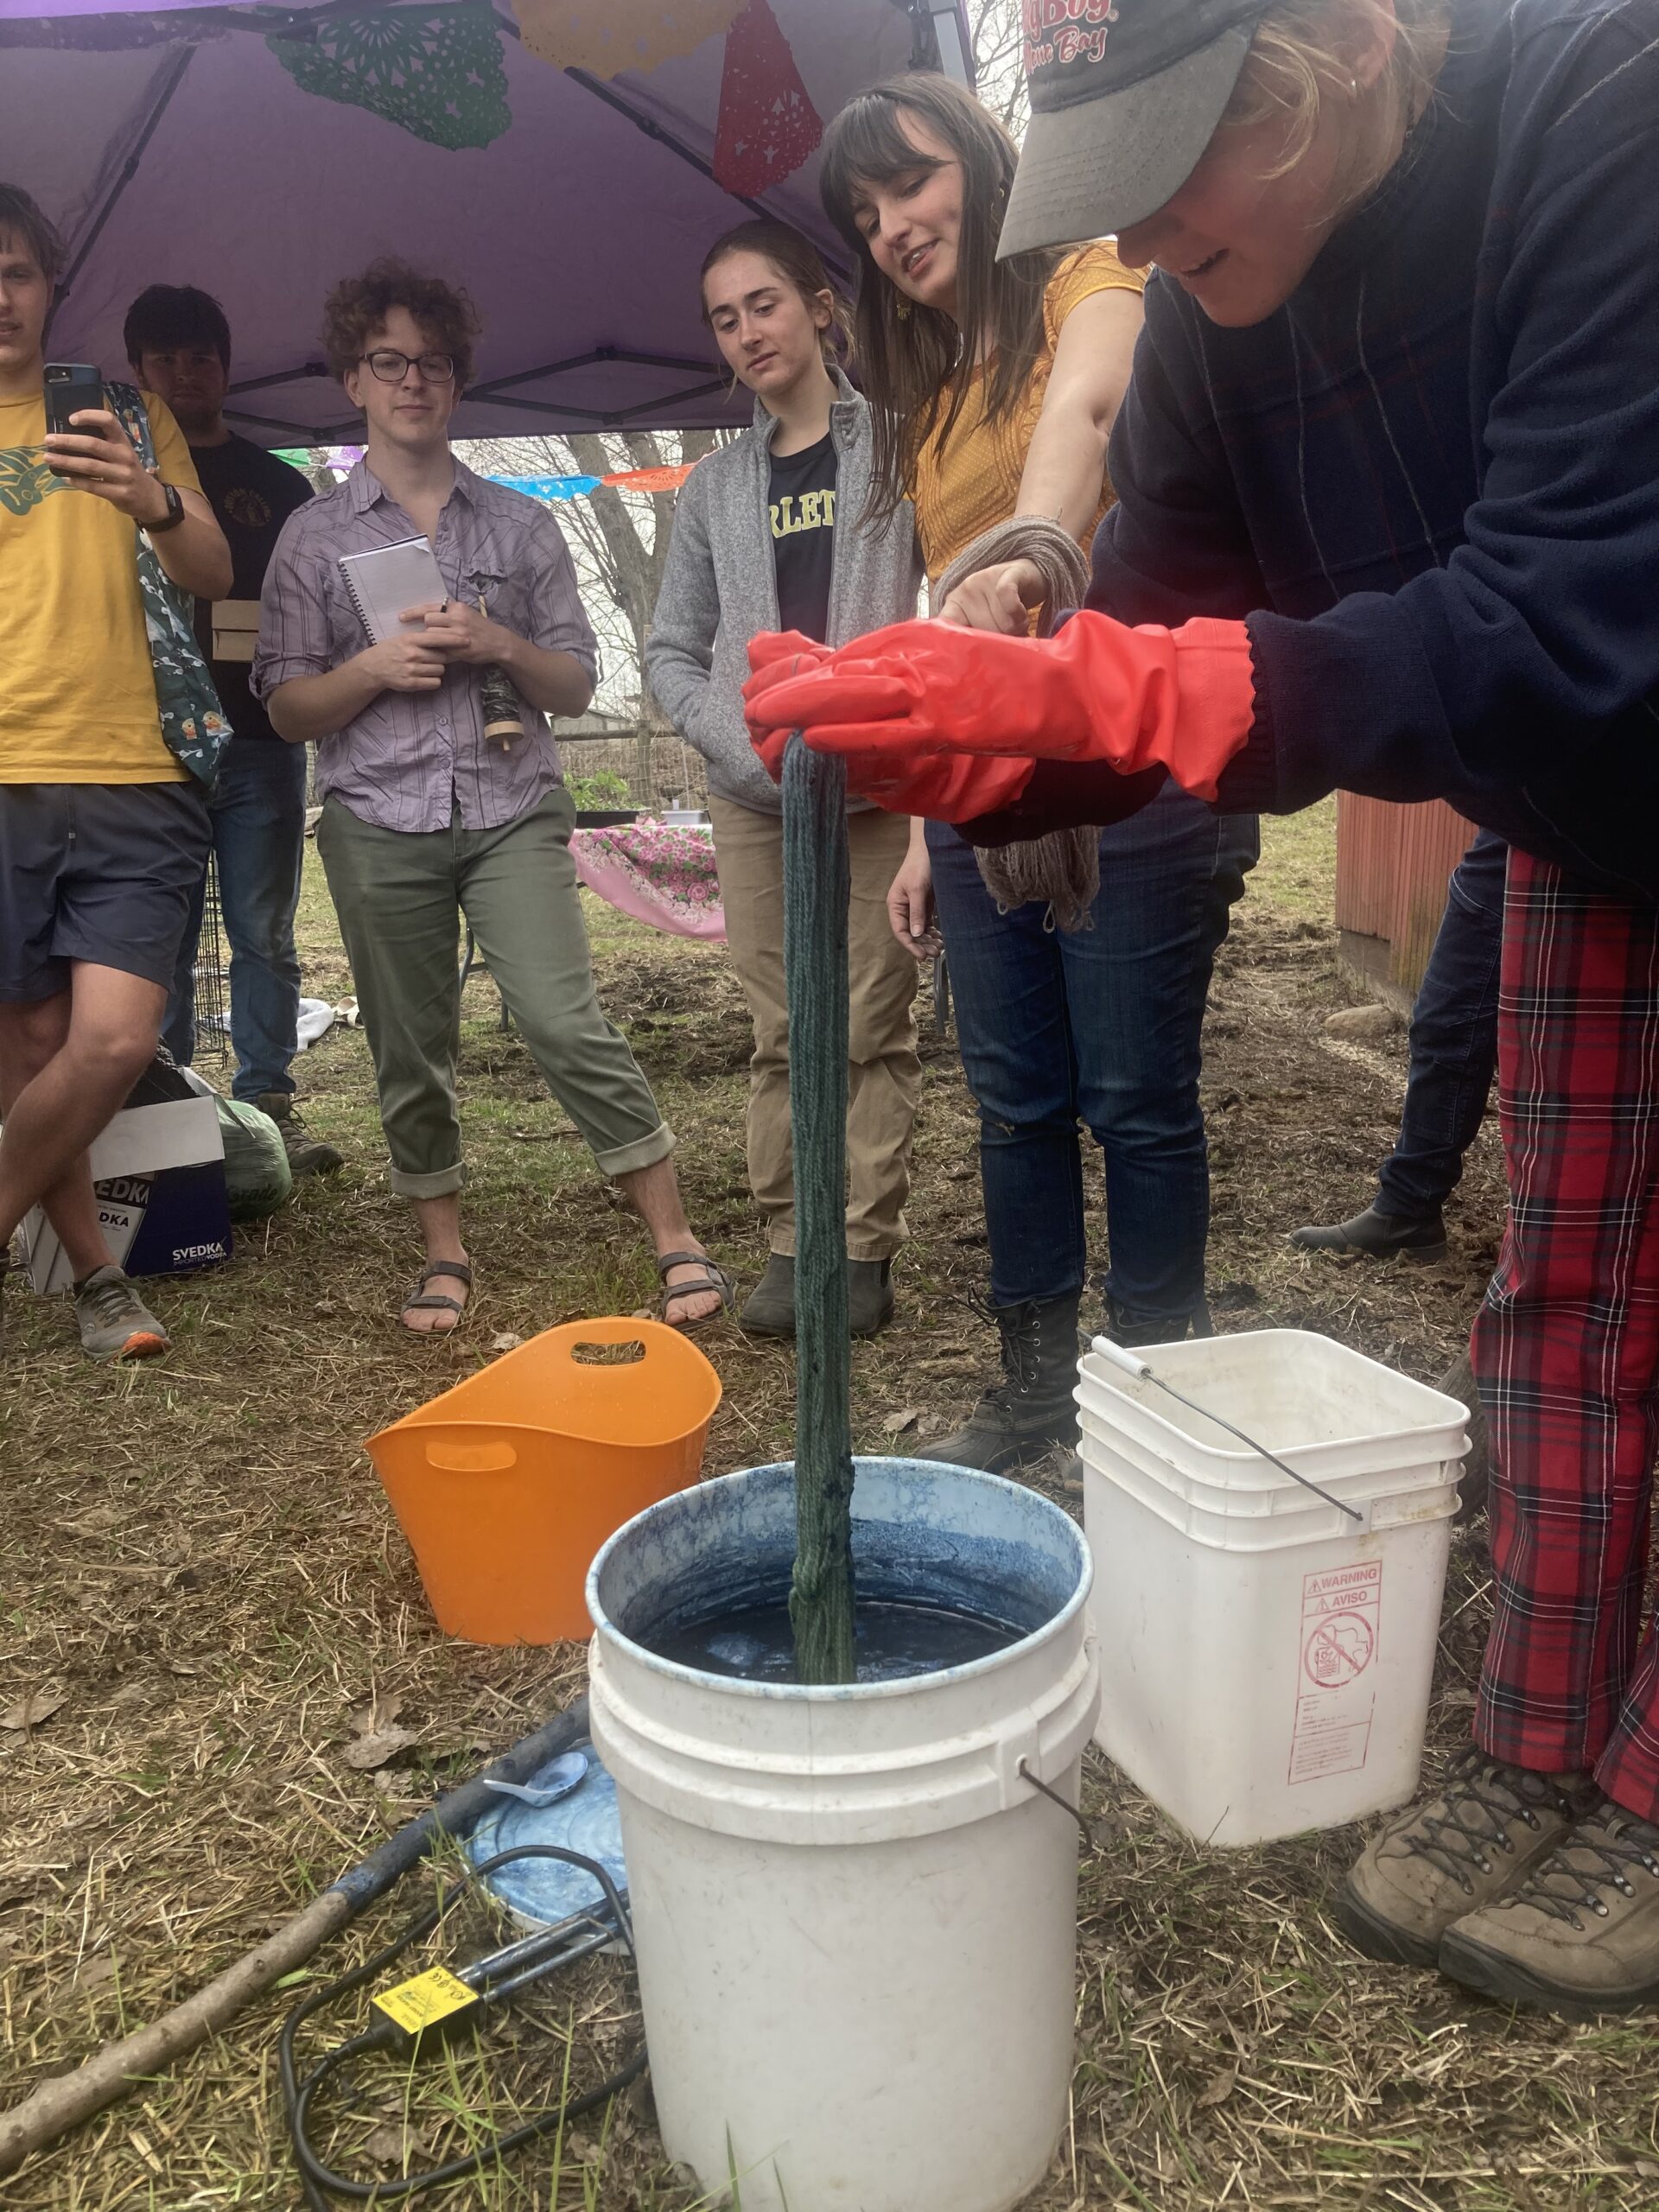
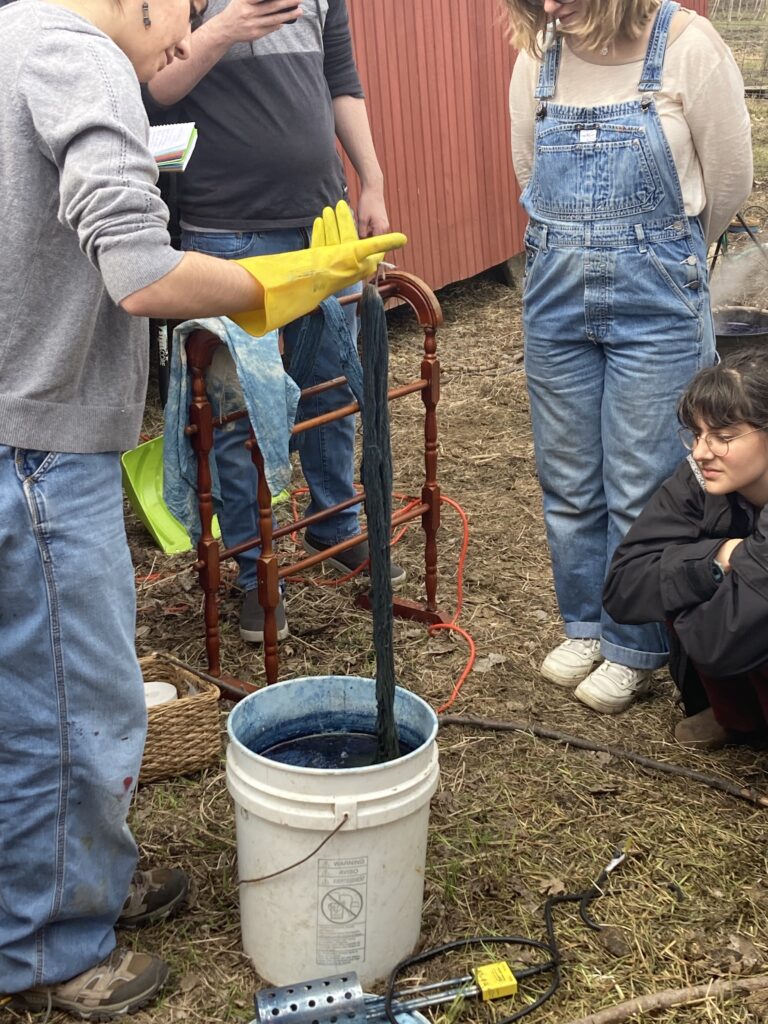
For the indigo dye, we used the “flash dye” technique. Each item to be dyed was completely submerged in the dye for 5 seconds, then removed and immediately moved away from the vat. Alejandra explained that allowing the excess dye to drip into the vat causes oxidation which can cause the indigo to be less effective. Initially, when coming out of the vat, the dyed object is a green color, but as it oxidizes from the surrounding air it turns a deep blue color.
We initially dyed yarn and wool, but eventually dyed human skin, hair, shoelaces, and a pair of shorts.

Results:
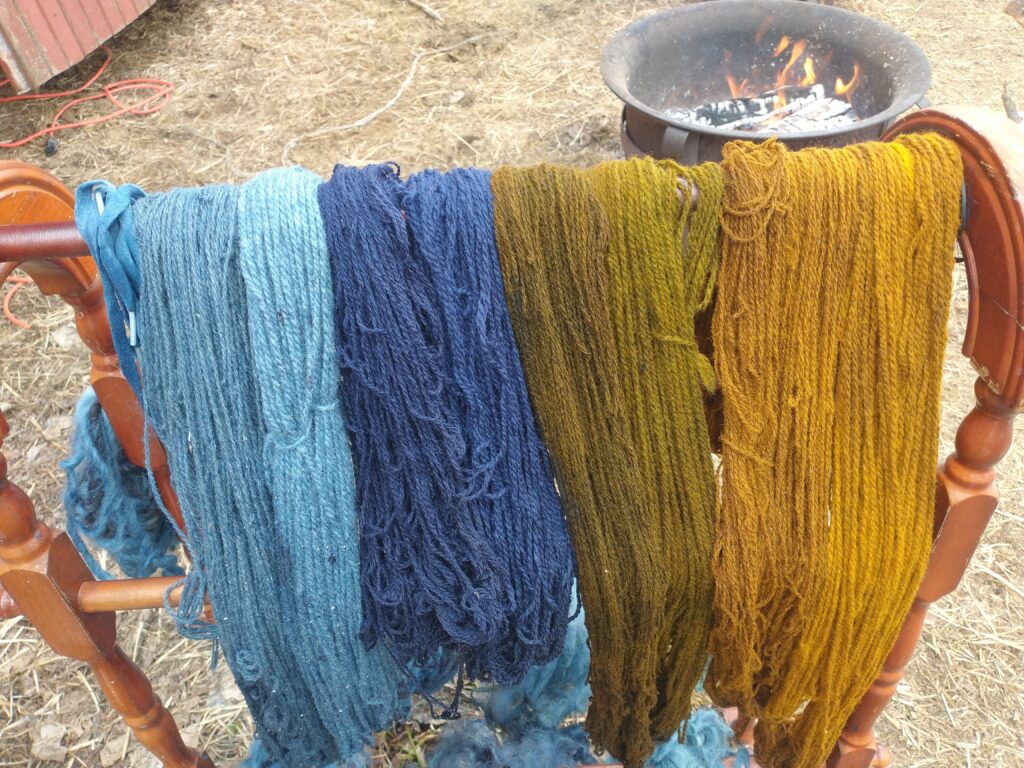
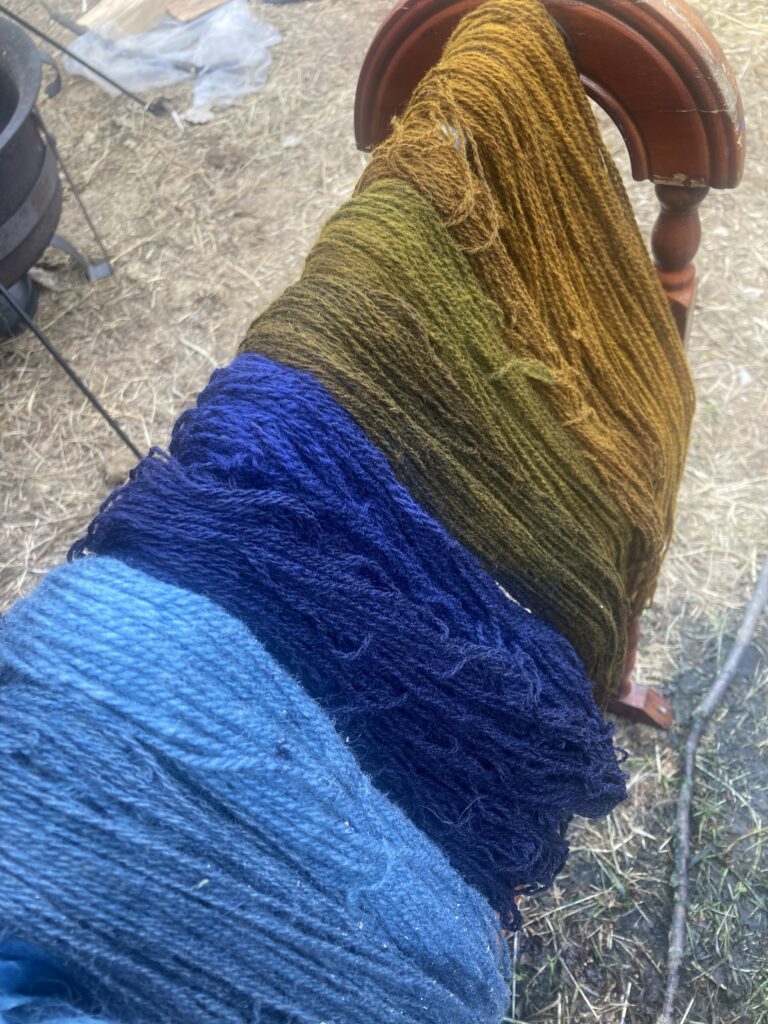
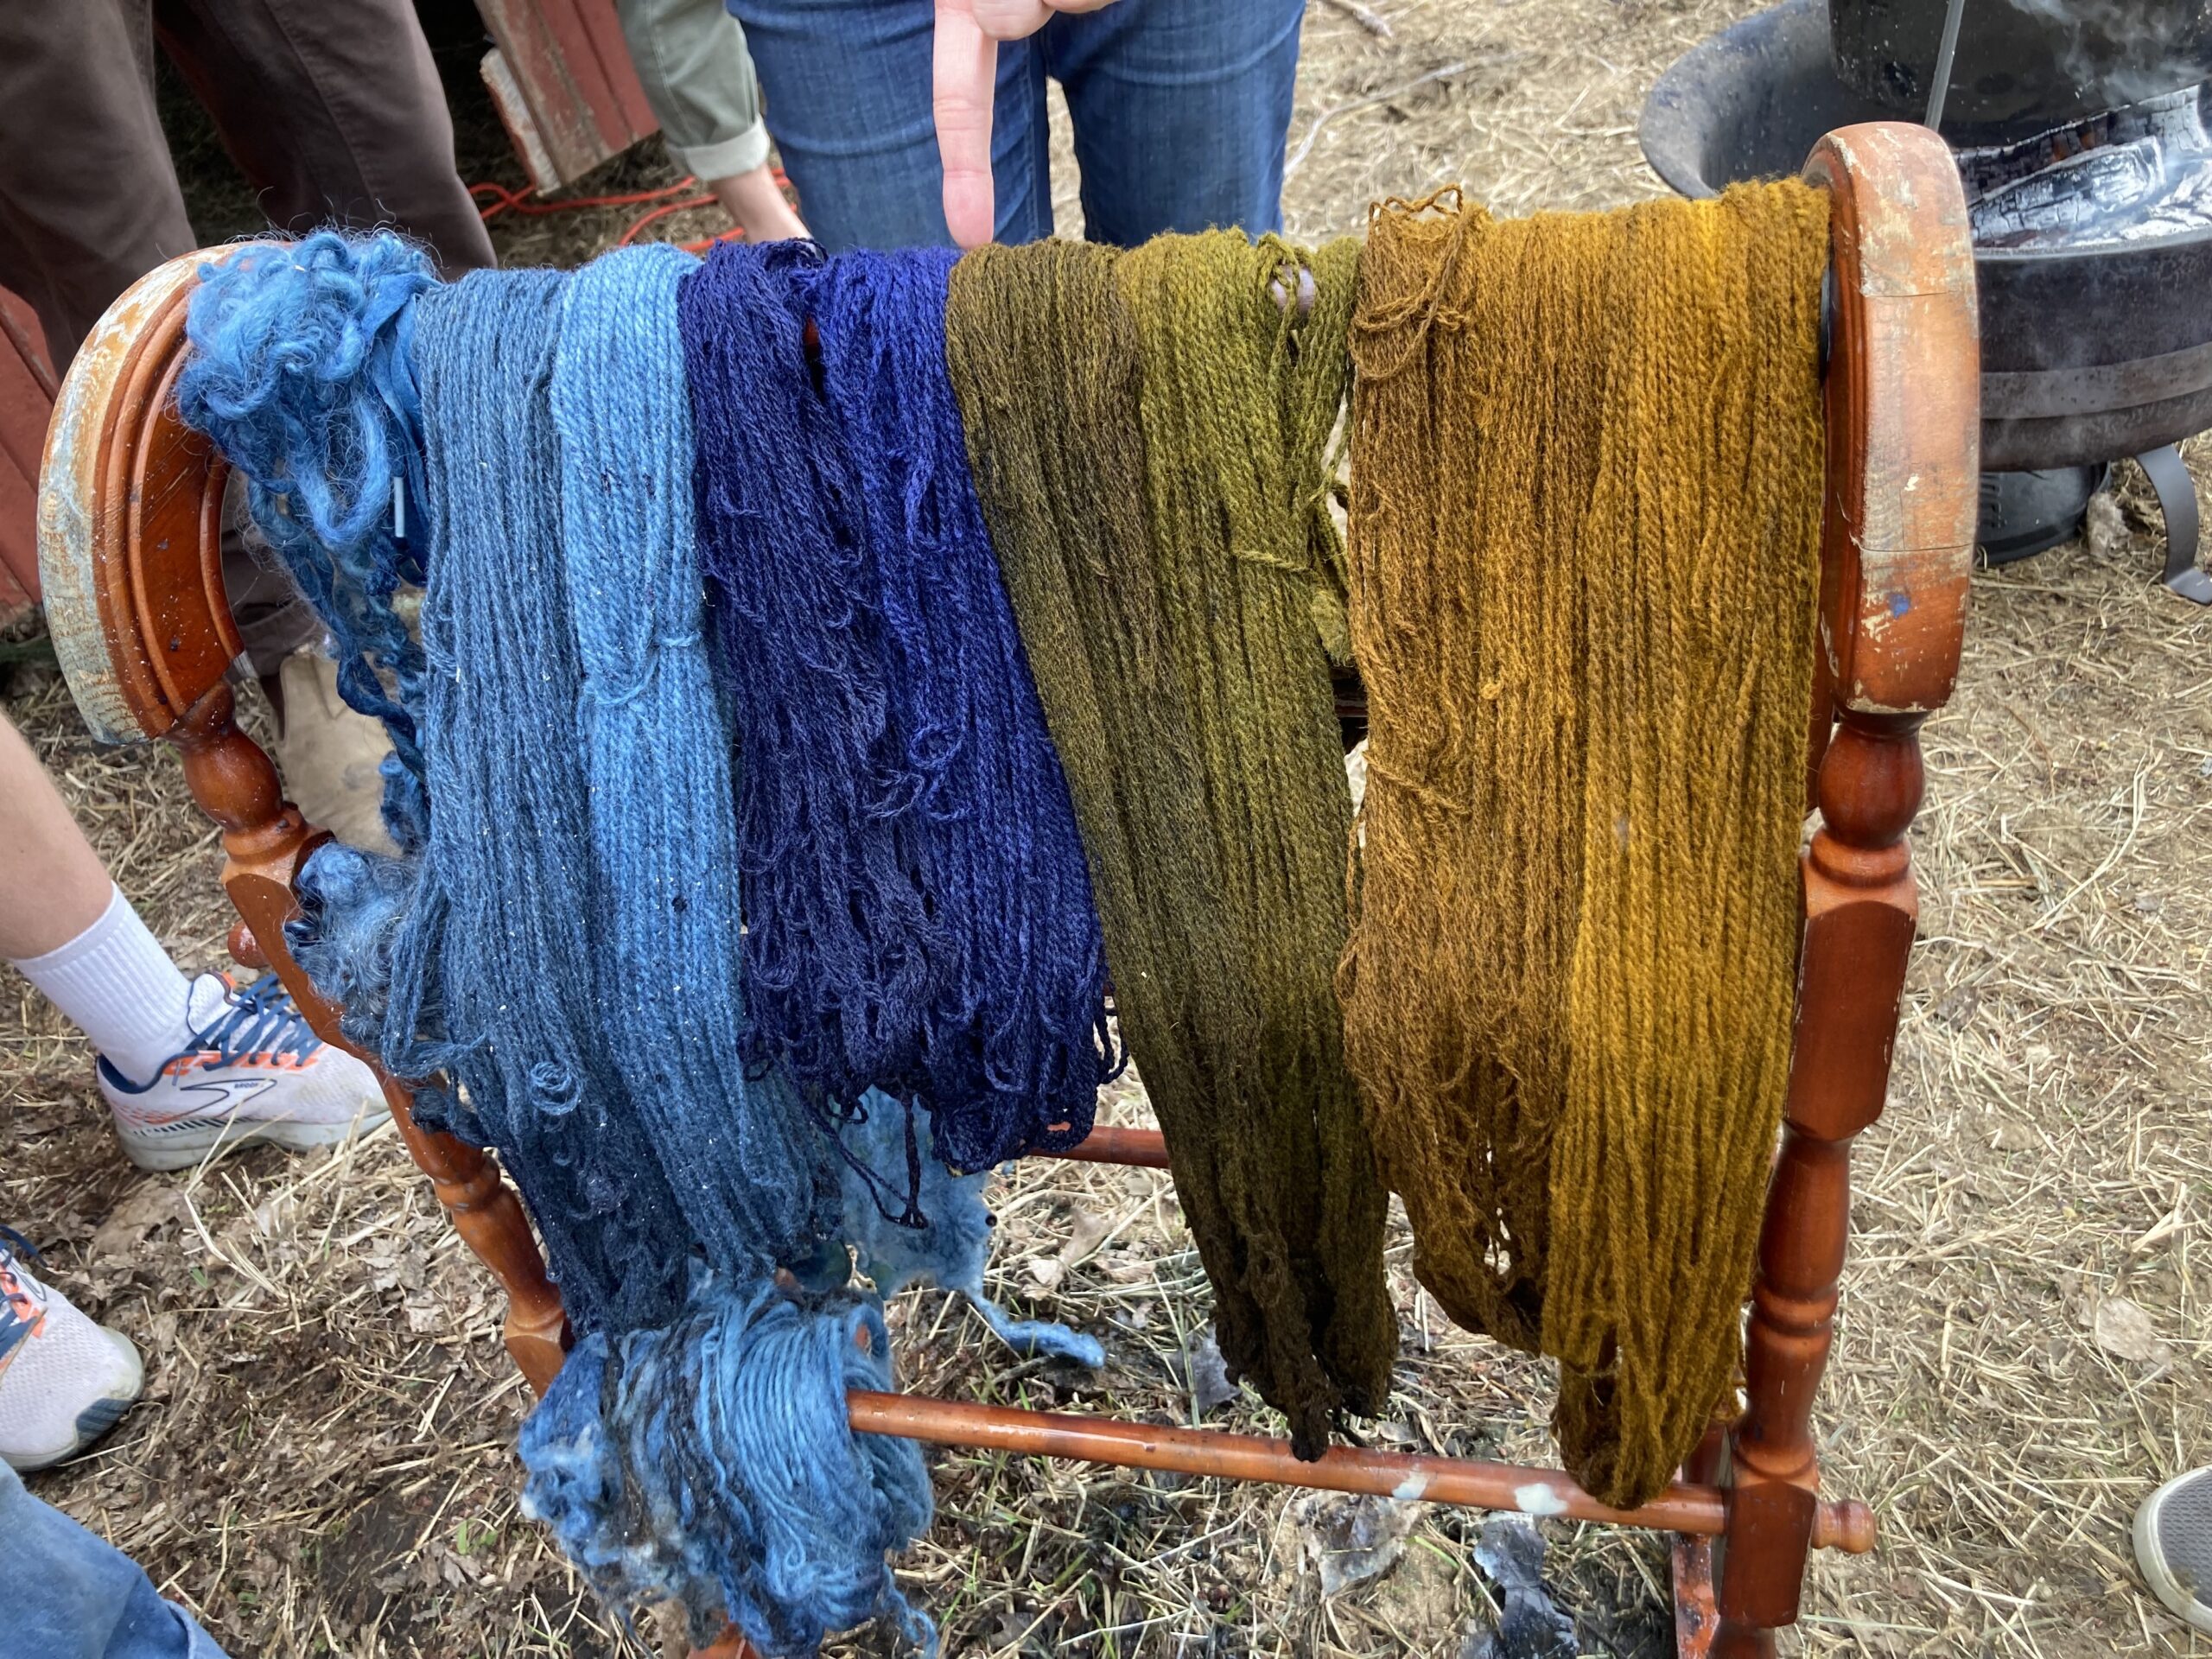
Marigold:
The marigold dye created a rich yellow color on the white yarn, and a slightly darker, though remarkably similar, yellow on the gray yarn. When the marigold yarn is then dipped in the indigo, the (originally) white yarn became an olive color, and the (originally) gray yarn became a dull olive color.
Logwood:
The logwood dye created a deep purple with some hints of red. The color appeared more purple than it shows on camera. The color of the yarn was similar in both the white and gray yarns.
Indigo:
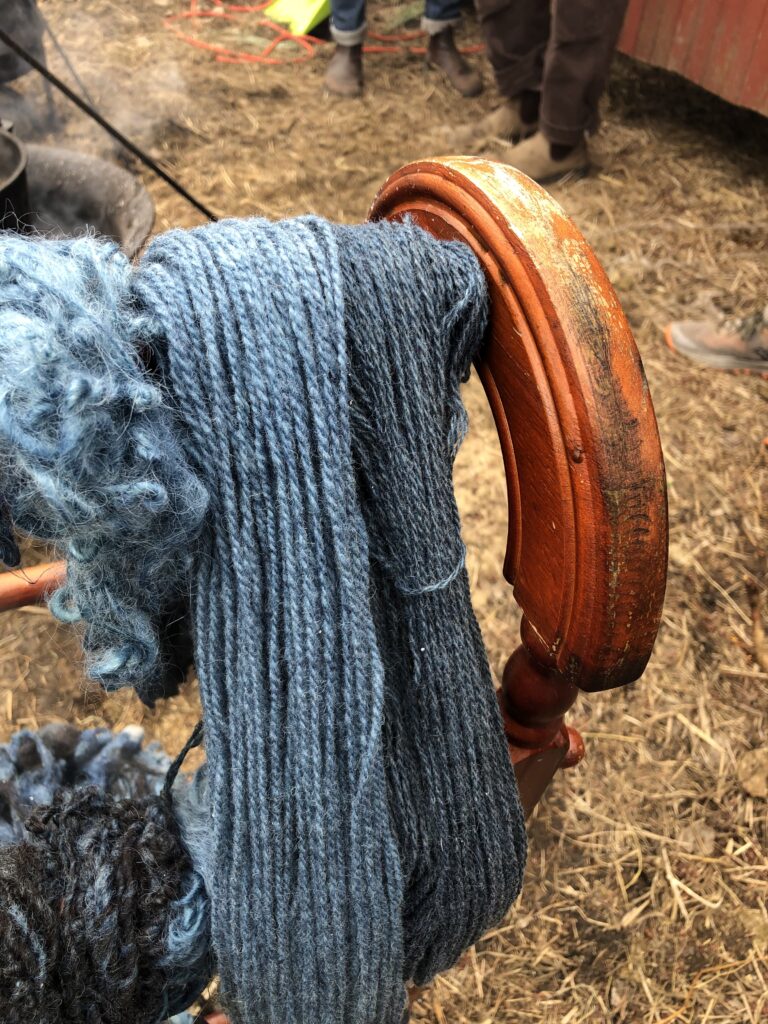
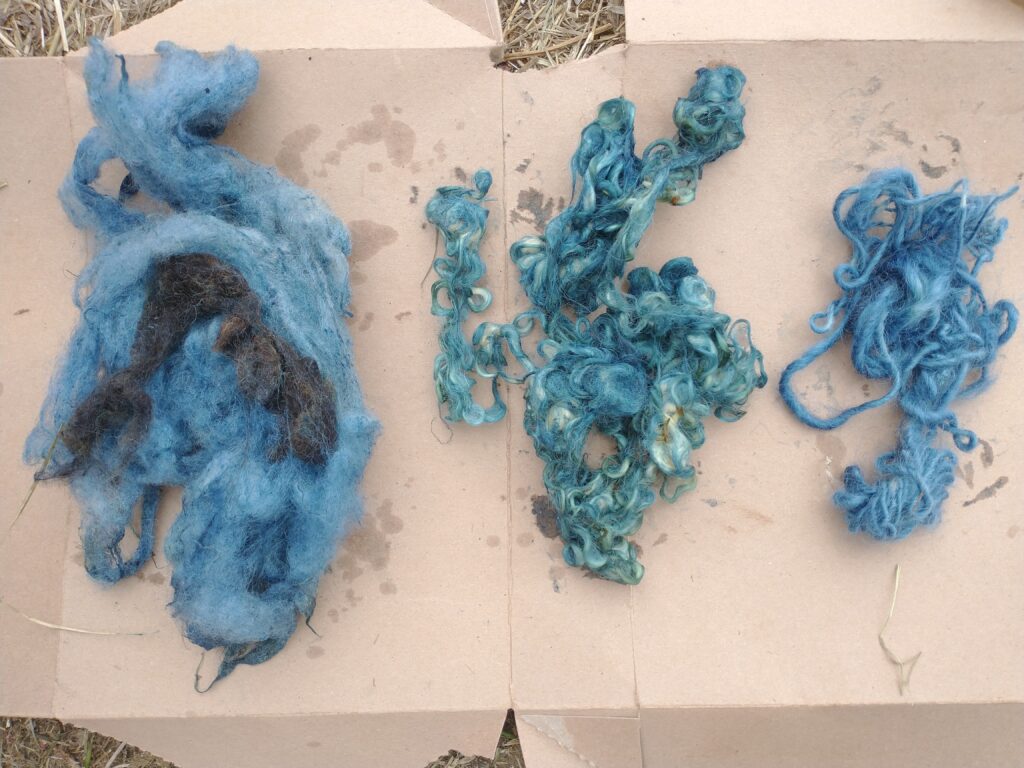
The indigo created a deep blue color when fully oxidized. It was a deep blue color with hints of gray, distinctly different from the initial green tint. The originally white yarn created a lighter blue color than the gray. The dye also dyed the raw and carded wool to a similar deep blue color. The dye worked well to consistently cover and color the whole of the wool dipped into the vat. The end color depended, once again, on the original color of the wool. The Lesiter wool, which started gray, created a darker, duller, blue than the Jacobs wool which started white. When removed from the vat both the carded and raw wools appeared matted, and would have had to be processed (or re-processed) in order to be useable for spinning.
Eventually we also dyed a variety of other objects in the indigo vat. It worked well to dye a pair of white shoelaces a deep blue, and created an interesting tie dyed pattern on folded cotton shorts. A variety of people also attempted to dye parts of their hair. The dye tended to be more visible on lighter hair colors, but the dye was not permanent and washed out after the first time people washed their hair. There was also an attempt to dye skin, which did color the person’s arm a dark blue. However, again, the dye washed out after one to two washes.


Data Summary:
| Dye Type | Water amount | Dye Amount | Mordant | Mordant Amount | White Wool | Grey Wool | Dye Time | End Color (white wool) | End Color (grey wool) |
| Marigold | 1 iron pot | 100g | Alum | 1 TBSP per 100g wool | 50g | 50g | 60 min. | Yellow Cheese | Yellow Cheese (darker) |
| Logwood | 1 iron pot | 50g | Alum | 1 TBSP per 100g wool | 50g | 50g | 52 min. | Delphinium Blue | Royal Blue |
| Indigo | Multiple gallons to fill vat | — | — | — | 50g | 50g | 5 sec. | Powder Blue | Sky Blue |
| Marigold, then Indigo | 1 iron pot, then the indigo vat | — | Alum (for Marigold) | 1 TBSP per 100g wool | 50g | 50g | 60 min, then 5 sec. | Delphinium blue | Royal Blue |
Conclusions and Reflection:
This lab was, overall, a great opportunity for us to learn more about the meaning of color in the ancient world by allowing us to directly interact with the process of dying. Color has an important role in many cultures that is obfuscated from us because all the clothes we buy are already dyed in factories that we do not see. We were able to see what many dyers saw when dying wool and experience the real time that some of these processes take–not every dye is like indigo where one can color yarn in a matter of seconds. Additionally, despite the fact that the ultimate process of indigo dye occurs in seconds, the prep work is a very involved process which takes significant time and skill to create a useful product. Additionally, while not directly addressed in the lab, the time to harvest the bases for the dyes came as a surprise to many of us. The difficulty and commitment of resources needed to harvest these dyes served to highlight the importance of color in ancient societies. Seeing the sheep was also a great opportunity to cap off our focus on wool and shepherds. They surprised all of us with how sociable they were and made us understand how the shepherds were able to sleep with a sick lamb all night to keep it warm and safe.
0 thoughts on “Lab Summary Week 5: Dyeing and Animals”